
Stepping into the world of the Orbic Journey R flip phone should feel like greeting an old friend, not solving a puzzle. While flip phones may remind us of simpler times, today’s models pack modern features into that satisfying clamshell design.
This guide strips away the complexity of your Orbic Journey R, transforming technical jargon into clear, actionable guidance.
Whether you’re embracing the flip phone lifestyle for the first time or returning to this classic format, we’ll help you master every feature – from basic calls to unique capabilities – with straightforward, practical instructions.
Let’s unfold the potential of your new device together.
Getting Started: Unboxing and Setup
Unboxing your Orbic Journey R is the first step to unlocking its potential. Let’s go over what you’ll find inside and the simple steps to get your phone ready for use.
What’s in the Box
Expect the essentials to get started:
- Orbic Journey R phone
- Charger and USB cable
- Quick Start Guide
- Battery
Initial Setup
Setting up your phone is a breeze:
- Open the back panel and insert the battery.
- Insert your SIM card and optional microSD card for storage.
- Power up by holding the power button until the screen lights up.
Charging Your Device
Keeping your phone charged is easy:
- Plug the USB cable into the charger and connect it to the phone.
- Verify the battery icon on the screen indicates it’s charging.
Read also: Verizon eTalk Flip Phone Manual
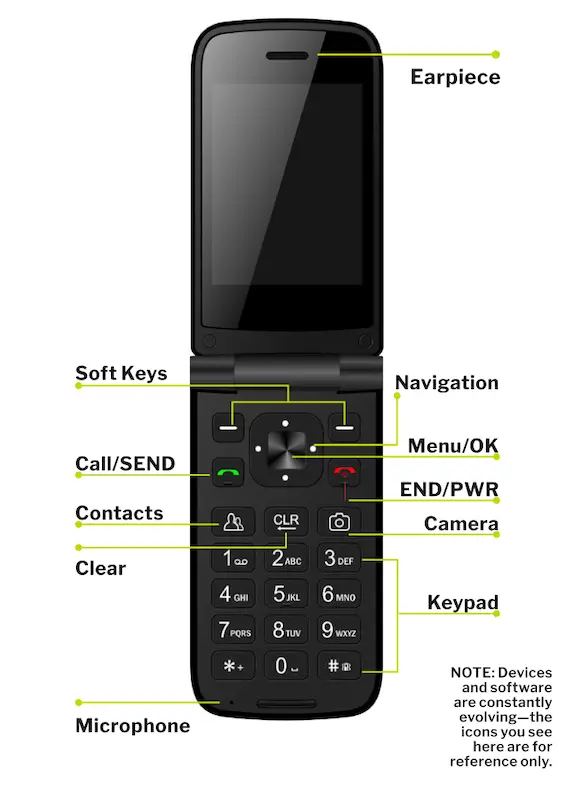
Once powered on, learning to navigate the Orbic Journey R is key. Here are the primary tools to help you master it:
• Home Screen: Your starting point for essential apps and notifications.
• Menu Button: Access settings and a full list of applications.
• Call Functionality: Dial numbers manually or use saved contacts.
Core Features
Your Orbic Journey R is equipped with a range of useful features. Let’s explore the basics:
Making Calls
Easily connect with others:
- Open the phone app, enter a number, and press the call button.
- For faster access, use your contacts app.
Messaging
Stay in touch via text:
- Compose and send messages through the Messages app.
- Add a personal touch with photos or emojis.
Camera
Capture memories on the go:
- Press the camera button to open the app.
- Use zoom controls for detailed shots or wide views.
Settings Overview
Customizing your Orbic Journey R enhances usability. Here’s how to adjust key settings:
• Wi-Fi Setup: Go to “Wireless and Networks” to connect to available networks.
• Sound Adjustments: Personalize your phone’s ringtones and adjust volume levels.
• Display Settings: Modify brightness and font size to suit your needs.
Pro Tips for Optimizing Your Orbic Journey R
• Regularly back up your data to avoid loss.
• Use a protective case to safeguard the device.
• Familiarize yourself with key features like emergency contacts and accessibility settings.
Download User Manual
Before you can start using your Orbic Journey R Flip Phone, it’s essential to have access to the detailed user manual for proper operation and troubleshooting.
The user manual is available in PDF format, which you can easily download and save to your computer or mobile device for convenient reference.
Download Link: Orbic Journey R Flip Phone User Manual
Frequently Asked Questions
1. Why won’t my phone turn on?
Check if the battery is installed correctly and charged. If it still doesn’t power on, hold the power button for 10 seconds or try a hard reset.
2. How can I fix Wi-Fi connectivity issues?
Ensure the Wi-Fi is enabled in settings. If the problem persists, restart your phone and router.
3. What should I do if my screen is frozen?
Remove the battery, wait for a few seconds, and reinsert it. Power on the phone and check if the issue resolves.
4. How do I extend my battery life?
Use power-saving modes, lower screen brightness, and close unused apps.
5. Where can I find software updates?
Navigate to “Settings” > “About Phone” > “Software Updates” to check for and install updates.